Friday, June 27, 2014

Quilt delivered

Quilt Completed.

I finished the quilt for Thomas.  I got it washed to make sure that all chalking was out and it was ready to use.

Thomas is two.  He was over on Thursday with his dad, Clif.  I had put the label on the quilt and it was ready for delivery.  I gave the quilt to Clif and he was very excited to show to Thomas.

Clif, opened the quilt to show, and said, "Thomas, look what Nana made for you.  Do you need a new blanket to keep you warm?"

Thomas's answer.  "No."  (In his usual non-interested mode)

Oh, How I love the honesty of children.

But I think Clif and Becky were very excited over the quilt.  I'm sure in years to come, Thomas will be much more expressive.

I embroidered the label and used a blanket stitch to attach.(forgot to snap a pic)

Hugs & Cuddles
From Nana to Thomas
Summer 2014

Thursday, June 26, 2014

Puff Pastry

Apple Turnovers

I never buy fruit in bulk but a couple of weeks ago I bought a bag of apples.  These were to make a Fresh Apple Cake for Mom to serve at a luncheon she was having for some of her friends.  The apples sat in the fruit bowl until last weekend and I decided to keep from losing them it was time to peel and cook.

Apple turnovers are one of my favorite desserts though I have never been good at cooking the southern version called "Fried Apple Pies."

I asked Hubby to find me a good recipe and a search was done for recipes on the web.  I was busy working on the quilt that I needed to get finished and he loves food so he is always willing to help.

Several were presented but the winner was, Apple Turnovers, from Taste of Home.
This is probably a very simplified Puff Pastry.....I really have not looked for a recipe for Puff Pastry because I have been told that it was hard to make.

Nevertheless.....this taste and looked like the real thing.
 
Lucky for us that the recipe only made 4 turnovers.  I don't think we would have had enough will power to not eat more.


Wednesday, June 18, 2014

Quilting in Progress

Quilting in Progress

I sat down and drew out on paper the two different square patterns and then pondered the possible quilting patterns.  I was sure that on the modified log cabin block that it would be quilted in the ditch to show the log cabin portion.  It was a puzzle as to how to quilt the "picture blocks".  The larger blocks were pretty simple....stitch in the ditch to frame the picture.  The smaller blocks required the thought.  I was sure that I did not want to stitch each one. So the graph paper was very helpful to determine that I would outline the picture, make a diamond square, then created a design using diagonals across the outside round of 2" squares.  I don't know if you can tell exactly in the plan sheet.  I had drawn with pencil and design is in red.  I then decided the "3inch-X's" in the sashing was easy enough, since the large blocks were 6inch.
 
Hopefully you will be able to see some of the quilting design in the pics below.


The back often show the quilt design better.....
Modified Log cabin

Large picture block

2"blocks/picture block
 
And the quilting continues as I try to reach the goal of delivery by the end of June.


Friday, June 13, 2014

Quilt Top

Quilt Top Piecing Complete

I have worked steadily. Too much rain for me to do much other than stay inside and sew.

I did have to go back to the fabric store last Saturday to get some extra fabric to complete the sashing.
Since I did not really have a pattern and was designing as I went....what could I expect.

You can see on the bottom left hand corner where I was testing options for sashing the quilt.  Also,  it looks funny because I had not completed the  bottom row of squares.

The small strip of the tan fabric had not been in the original plans and also I had mis-cut a strip of the orange causing me to be short.  Thus the trip on Friday.

But I am pleased with the results.

Next comes the quilting. 
I have never tackled machine quilting anything larger than a placemat.
But, there is always a first.

My dining room table is large and I put a mat over it to get busy putting together the 'batting sandwich."
 
I have the sandwich spread and pinned.  Now, What next.
Need some time to THINK!


Wednesday, June 11, 2014

Prepare for Quilitng

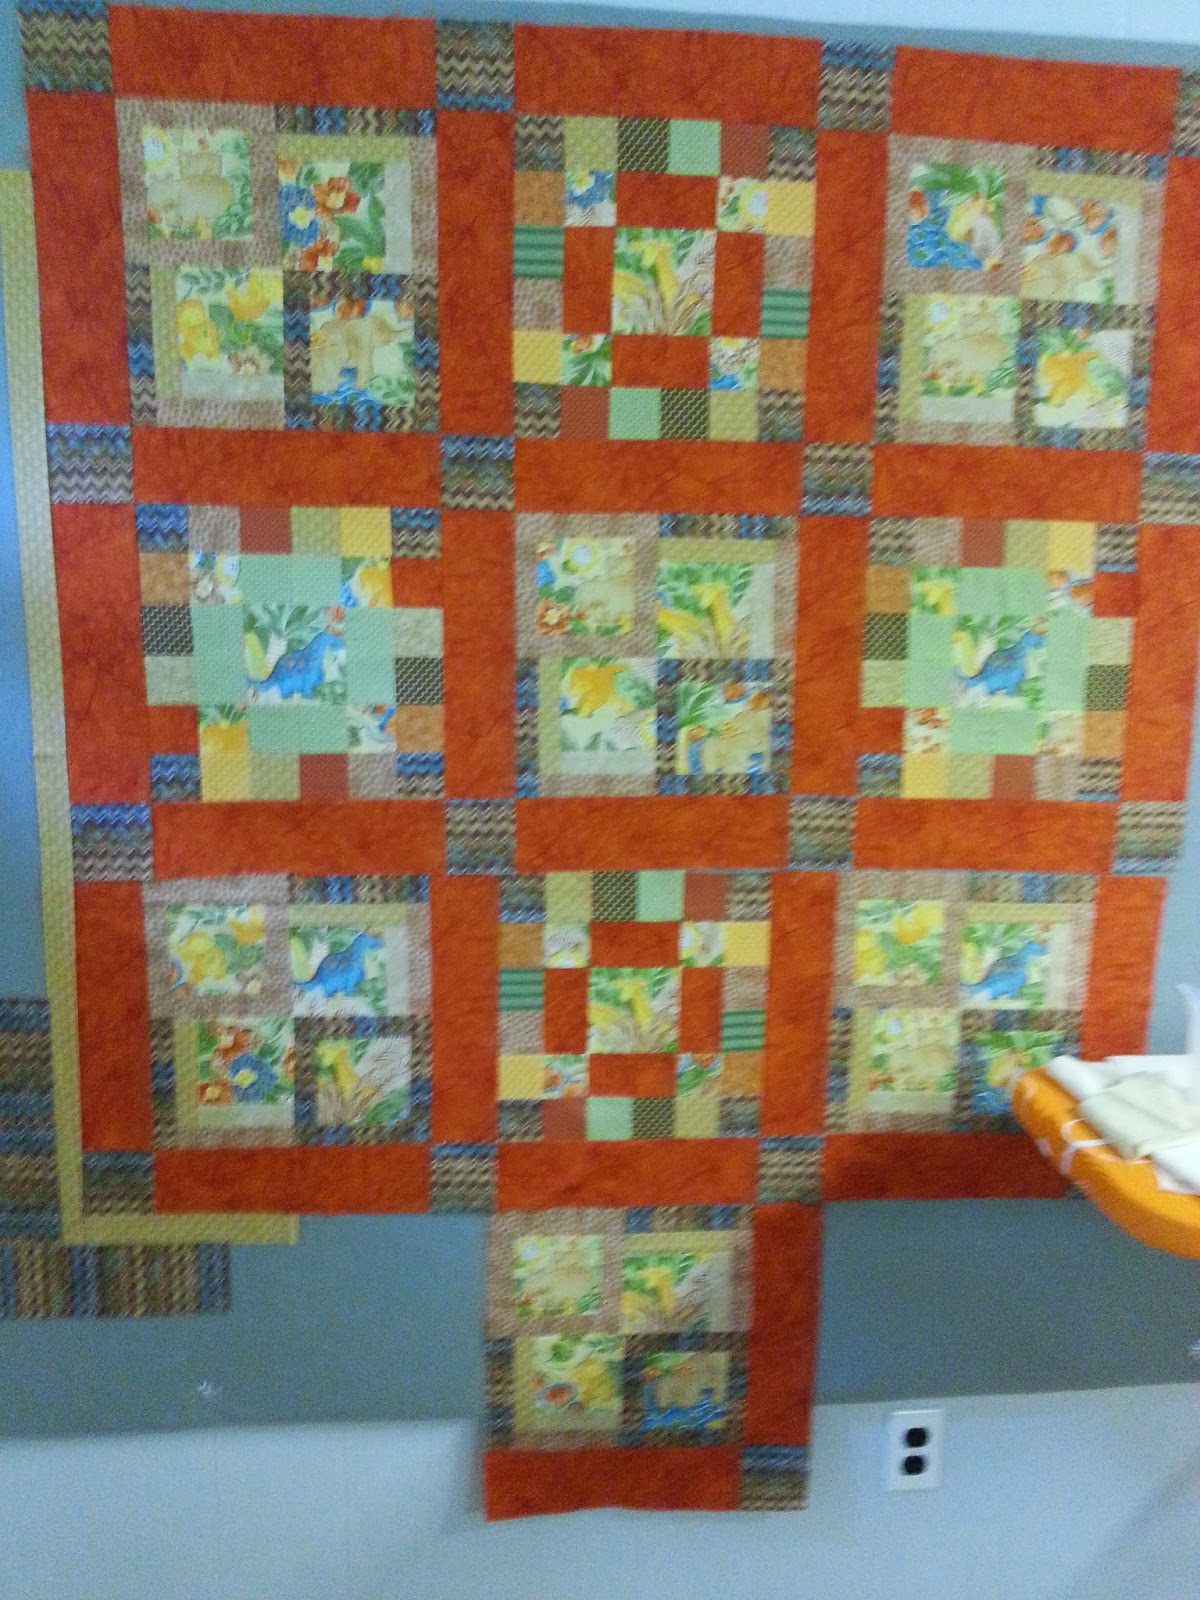
One of the first quilting projects in my retirement is for grandson, Thomas.

I will be using many of the same fabrics that were used in his older sisters' quilts.  This is a children's animal print with vibrant colors of green, turquoise, and terracotta.

But before starting the quilting project, I got hubby to assist in building the long desired Design Wall and a pressing board.

We used the foam insulation board, purchased from the local Lowes.  Hubby cut 5'x6' and hung with some mirror screws.

I made a fabric bag for the board to go into.  I am always concerned with cleaning and thought that the bag could be removed, washed, and rehung easily.  I was looking for something that would somewhat blend with the wall color so luck was with me on our Spring trip to Texas and I found the gray felt.  I was not wanting white because the fear that continuous hands on would get dirty very quick. 

The pressing board is just that.....small piece of plywood, covered with only 1 layer of batting and fabric.
I have it set up in arm's reach of the machine with the Oliso iron. Love this iron because you do not have to stand it up on end.  The way you see it sitting here is the way it stays.

I have a large cutting mat, on the sewing table behind the sewing machine and a small one in front of the presser foot for trimming of small pieces as I sew and press.


I am now set up to get the quilting underway. 

Oh, and you can see that I have a mess on the table with several projects going at once.

Quilt will continue first.

Friday, June 6, 2014

The Perfect Jean

I have been trying to get myself focused on making my own clothing since I joined the NO RTW. I have stayed true to the challenge, but I have not been sewing either.

I have made the attempt at fitting pants----Using McCall's pattern M5142 from 2006, Palmer/Pletsch,The Perfect Jean.  The pattern gives several options for fitting much like you find in the current ready wear environment.  Classic fit, Skinny fit, Curvy fit; sits @ waist, or slighty below waist.


I cut the size 10, curvy fit.  I have a waist line that usually is very hard to fit in RTW.  Using 2 old shirts that my son-in-law had discarded as my sample fabric, the adventure began.

The pattern identifies adjustment areas and also 1" seam allowances.  Luckily very little adjustment was needed. 
 I had to use the yokes from the shirt piecing the leg for a length that I would use.  You can also see a shading near the inner leg, that was the starched crease on the pleat  in the back of the shirt.

 
I used the shirt pockets for the hip pockets.  There is a little puckering @ the top of the hip in the yoke area.  I really think that due to the way that I had to cut pieces from the shirt to get this completed, that there was too much bias and the stretch occurred. 
 
My seams followed the recommended 1" except for a small area just @ the top of hip on side seams.  Approximately 3" below waist for about 4".  I let the seam out 1/4" to try and reduce the pull along the opening of the front pocket.


Overall I think I got a good fit. I will be wearing these around the house and my next pair will be a capri in stretch white denim.


FMQ domestic machine

 I have been reading and watching  many YouTube videos on FMQ. One of the best hints I found for basting was......pin first, then between th...